4.3. Common tasks
In this chapter, we use a model of dipropylether
(dipropylether.xyz),
Silicalite-1
(silicalite1.zml),
THF
(thf.xyz),
and an MFI precursor model
(precursor.zml).
4.3.1. Adding bonds to the model
Load the file dipropylether.xyz. Your
window should be similar to figure the figure below. Zeobuilder only shows the atoms and no
bonds because the XYZ format only contains atomic coordinates. One can easily add
bonds automatically based on a database of average bond lengths in two steps:}}
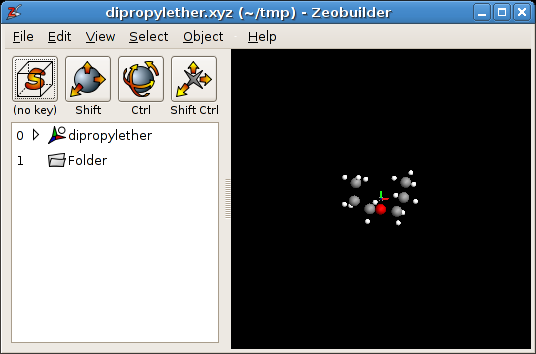
Zeobuilder with dipropylether.xyz
- Select the global reference frame. The easiest way to accomplish this, is by clicking on the first node in the tree view.
- Activate the function
Object -> Molecular -> Add bonds (database)or pressCtrl-B.
Zeobuilder always selects newly created objects after any operation. In this case all the bonds are selected.
One might wonder why bonds are explicit objects in Zeobuilder. At first sight it seems much simpler to draw them always automatically in the 3D view, without listing them in the tree view. These are the reasons to choose for explicit bond objects in Zeobuilder:
- The ‘automatic’ approach implies that the internal list of bonds has to be updated automatically each time one or more atoms are displaced. For small models (<100 atoms), this is OK, but for very large models (>1000 atoms), this becomes a CPU-consuming process and it will kill the responsiveness of the program.
- When preparing a model for a molecular mechanics simulation, the bond graph is also an explicit part of the input. It is therefore useful to offer the possibility to add or remove bonds manually.
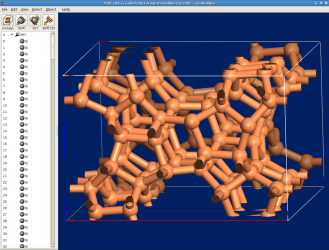
- In some applications, bonds are used to display the topology of the structure
at a slightly larger scale. When visualizing Zeolite models, this is a common
practice. In the figure below, the oxygen atoms are omitted and the neighboring
silicon atoms are connected by bond objects. This has been accomplished with
the menu function
Object -> Molecular -> Add bonds (parameters). Try this, starting from the original MFI model (silicalite1.zml). The mfi model is based on the data from the Zeolite atlas.
4.3.2. Internal rotations
In this section we will demonstrate how the hierarchical data structure of
Zeobuilder proofs to be helpful when performing internal rotations in a
molecule. Open the model dipropylether.xyz in Zeobuilder and
add the bonds as explained in the previous section. Two types of internal
rotations will be demonstrated.
The first example is a rotation of a methyl top. Take the following steps:
- Chose one of the two methyl groups in the molecule and select all atoms and bonds of the methyl group. These kind of selections are easily made in the 3D view by drawing a rectangle around the methyl group. Be careful not to select other parts of the molecule by accident. One can work with the middle and right mouse buttons to tune the selection.
- Activate the function
Object -> Arrange -> Frameor pressCtrl-F. Inspect the result in the tree view: The methyl group now lives in its proper reference frame. - Select the reference frame that contains the methyl group (in the tree view). Your window should look like this figure:
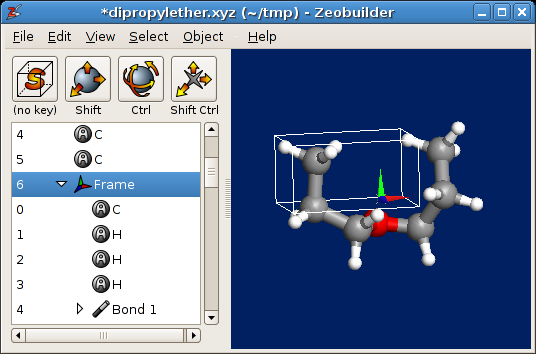
The methyl group in its proper reference frame.
- Add the methyl-C bond to the current selection, i.e. click on this bond with the middle mouse button in the 3D view.
- Use the interactive rotate function, i.e. drag with the left mouse button
while holding the
Ctrlkey pressed. (Make sure theCtrlkey is pressed before you start dragging.) You will notice that the methyl group rotates about the C-C axis. You should get something similar to the following figure:
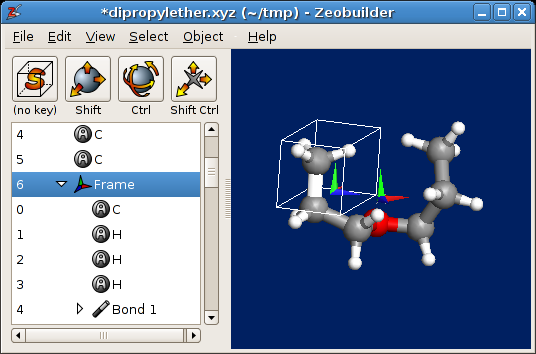
The methyl group after rotation.
- Select the methyl frame again in the tree view and activate the menu function
Object -> Arrange -> Unframe (absolute)or pressCtrl-Shift-F. The
The second example is a rotation that changes the C-O-C bending angle. Follow these instructions:
- Select a complete propyl chain. Perform this selection in the 3D view.
- Activate the function
Object -> Arrange -> Frameor pressCtrl-F. - Select the frame that contains the propyl group. Make sure only the frame is selected and not its contents.
- Add the oxygen atom to the selection by clicking on it the the 3D view with the middle mouse button.
- Start an interactive rotation by dragging in the 3D view while holding the
Ctrlkey pressed. You will see that the oxygen atom acts as a rotation center. - When finished, select only the reference frame of the propyl group and
activate the menu function
Object -> Arrange -> Unframe (absolute)or pressCtrl-Shift-F.
4.3.3. Pseudo rotations
Although the rotations in the previous section are rather trivial and probably
supported in many similar programs (?), this section describes more complex
cases that demonstrate the advantage of having multiple reference frames. To
keep this example a simple as possible, we will work with a THF model
(thf.xyz). Proceed along the following lines:
Load
thf.xyzand add the bonds.- Select the two carbon atoms next to the oxygen atom. Activate the function
Object -> Connect -> Arrow. This is our first rotation axis.
The second rotation axis is a bit more complex.
- First add a box to the center of the reference frame: Select the global
reference frame in the tree view and activate
Object -> Add -> Box. - The box is selected. For reasons of clarity, change to box color to
orange via
Object -> Propertiesor by pressing Ctrl-E. The color field is located in theMarkuptab page. ClickOKwhen done. - Select both the oxygen atom and the orange box.
- Activate the function
Object -> Connect -> Arrow. This is our second rotation axis.
- First add a box to the center of the reference frame: Select the global
reference frame in the tree view and activate
Next we will put the part of the molecule we want to rotate in a separate reference frame. Therefore select the oxygen atom, the neighboring carbon atoms, the hydrogen atoms connected to these carbon atoms, and the bonds between them. Press
Ctfl-Fto create the new reference frame.
At this point your model should be similar to this figure:

THF, an orange box and two rotation axes.
Now we are ready to make two types of rotations:
- Select the new reference frame and the first rotation axis. Perform an interactive rotation. This type of rotation brings the THF molecule in the envelope conformation.
- Select the new reference frame and the second rotation axis. Perform an interactive rotation. Such a rotation changes to geometry into the twist conformation.
One can save the new geometries to different XYZ files and run geometry optimizations to see if such conformers are stable.
From this example it should be clear that Zeobuilder is capable of performing any kind of rotation. One can freely define the rotation axis and the part of the molecule that needs to be rotated. Creativity is the last ingredient to get the work done.
4.3.4. Advanced selections
When working with large models, manually selecting a specific set of atoms (or
other objects) quickly becomes an intractable task. Zeobuilder can automatically
make complex selections based on filter expressions to surmount this potential
difficulty. Load the model precursor.zml.
Select the global reference frame and activate the menu function Select ->
Children by expression. A popup dialog will appear that looks similar to figure
A3.6. One can enter a valid python expression in the big (white) text entry that
will be applied to all child nodes of the selected container object. In this
example, the selected container is the global reference frame. If the expression
evaluates to True, the child node is selected, otherwise, the child is not
selected. Here are a few expressions to get you started:
- All atoms:
isinstance(node, Atom) - All bonds:
isinstance(node, Bond) - All hydrogen atoms: isinstance(node, Atom) and node.number == 1`
- All atoms connected to one or more hydrogen atoms:
isinstance(node,
Atom) and reduce(lambda x,y: x or y, (neighbor.number == 1 for neighbor in
node.yield_neighbors()), False)
The expressions in Zeobuilder are ordinary python expressions. Python evaluates boolean expressions with the Lazy evaluation technique. This means that for the evaluations of X and Y, expression Y will only be evaluated if X evaluates to True. This is different from low level languages such as C and Fortran, where lazy evaluations have to be implemented explicitly with nested if clauses. This means that the following expression will not work in general:
- All hydrogen atoms (does not work in general):
node.number == 1 and isinstance(node, Atom)
For example, when the selected frame also contains bond objects, which don’t
have a number attribute, Zeobuilder will generate an error message when the
former expression is used.
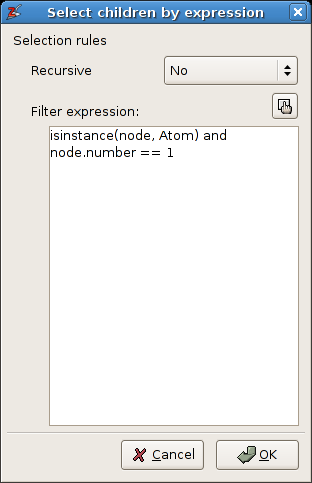
The popup dialog of the menu function Select -> Children by expression
Warning
The API of the filter expressions is not settled yet, nor is it extensively documented. There is no guarantee that these example will work in all future versions of Zeobuilder.